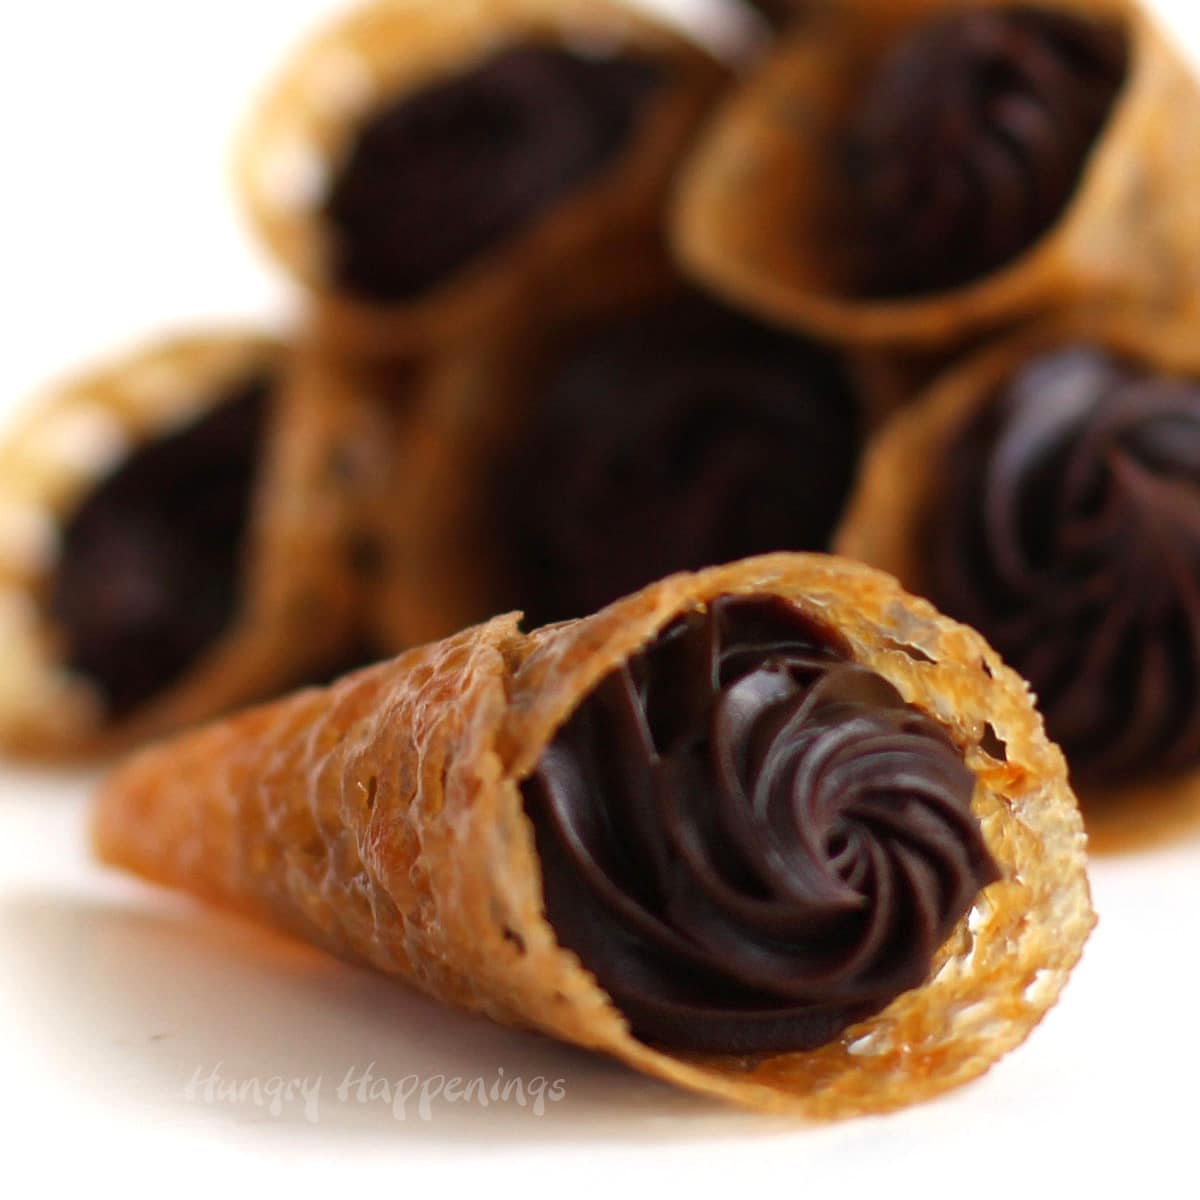
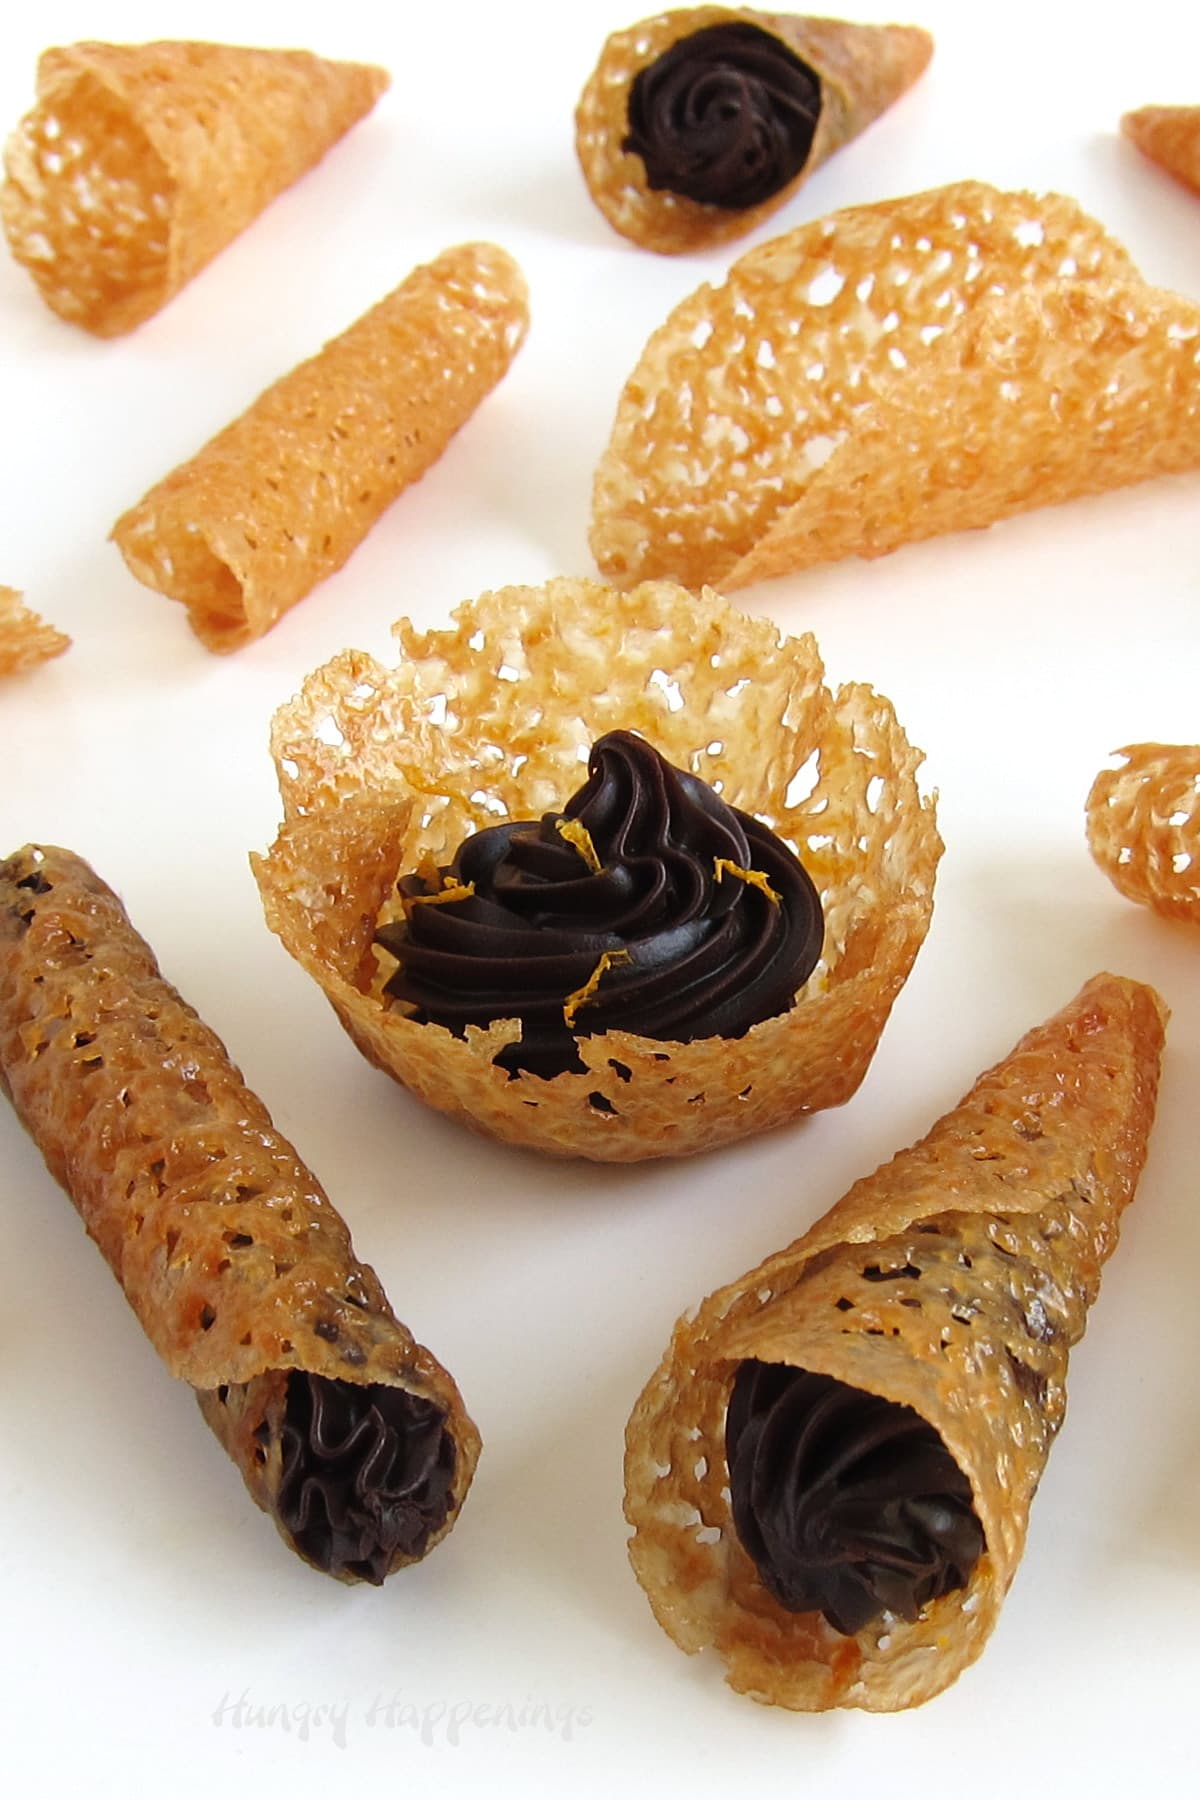
Crispy lace tuile cookies shaped into cones, cups & tubes filled with creamy chocolate ganache are delicately beautiful chocolate-filled cookies.
How beautiful are these lace tuile cookies filled with creamy chocolate ganache? They look so elegant but are much easier to make than you would imagine. I am excited to share this recipe with you.
It's been too many years since I've made tuile cookies. I forgot how much fun they are to make. Below I'll show you how to shape them into cones, tubes, cups, and even tacos.
These cookies can be made using plain dark chocolate ganache but I chose to flavor the ganache using orange zest. I also added orange flavor to the tuile cookies. The fresh flavor pops amidst the rich chocolate. You can leave it out if you prefer but I think it took these cookies to the next level.
So, let's make some chocolate-filled tuiles.
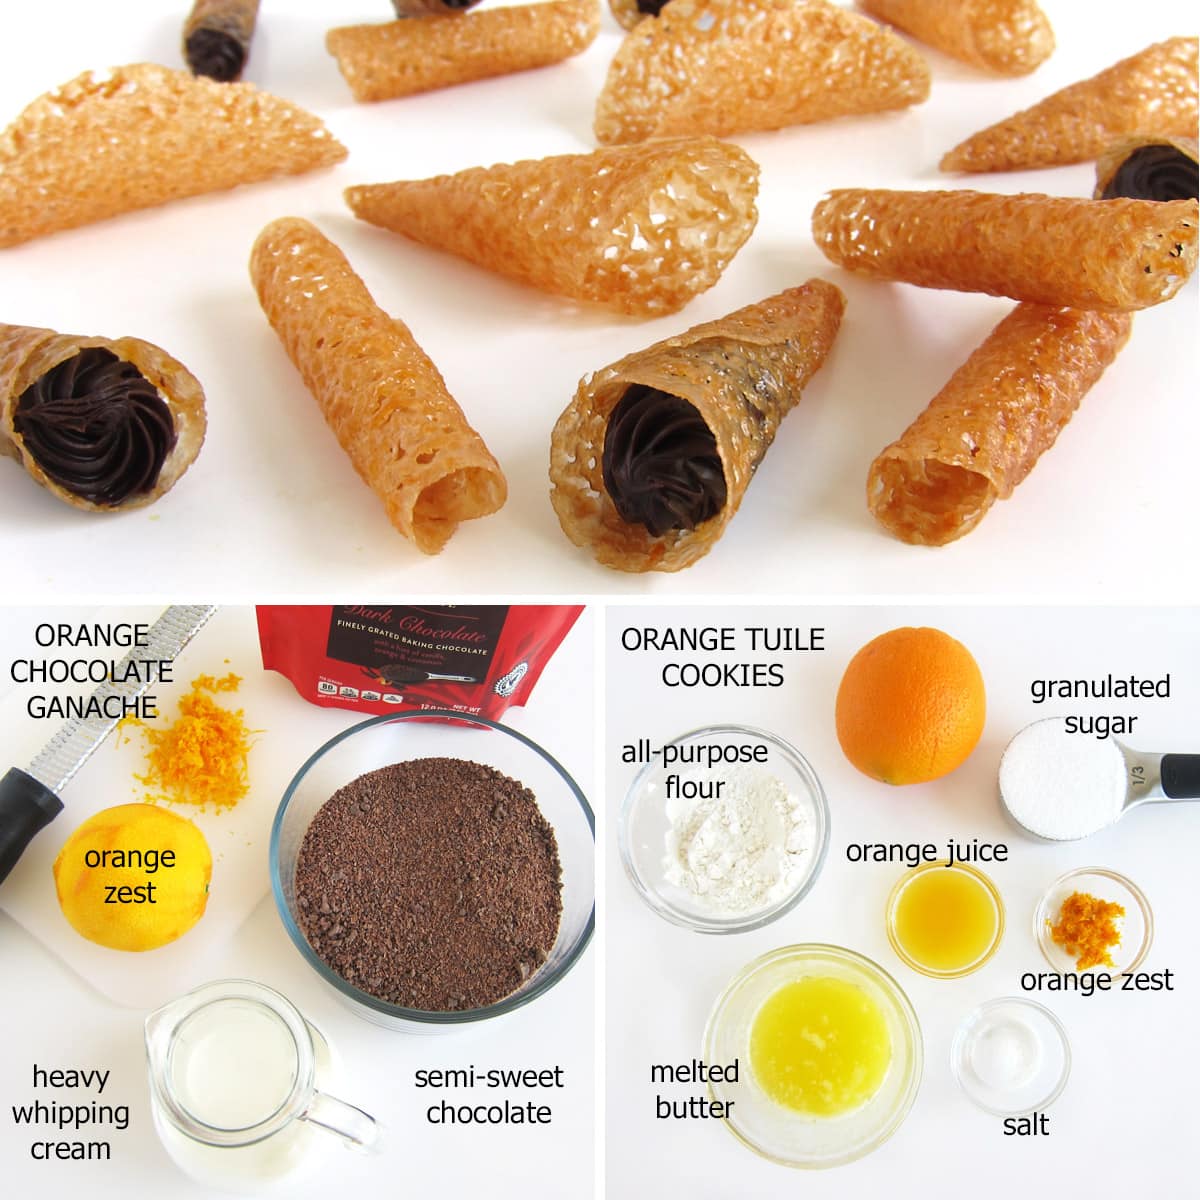
Ingredients
Orange Chocolate Ganache
an orange - For the ganache recipe, you will only use the orange peel (zest). If you prefer to use plain chocolate ganache, just omit the orange zest.
semi-sweet chocolate - I used grated American Heritage Chocolate (this product is no longer available). Grated chocolate melts more quickly, but you can use finely chopped chocolate bars or chips in this recipe.
heavy whipping cream - 36% fat whipping cream will give your ganache a creamy mouthfeel and rich flavor.
optional, light corn syrup - Corn syrup will help to ensure your chocolate ganache looks shiny.
Tuile Cookie Batter
You'll need:
sugar - Granulated white sugar will add sweetness and promote browning.
all-purpose flour - Will add structure to the thin wafer cookies.
salt - A small amount of table salt helps to balance the sweetness in this tuile cookie recipe.
orange - For the cookie batter, you will use the zest and the juice. If you don't want to flavor your cookies orange, just omit the orange zest and use water instead of the orange juice.
butter - Use unsalted butter and melt it after you measure it.
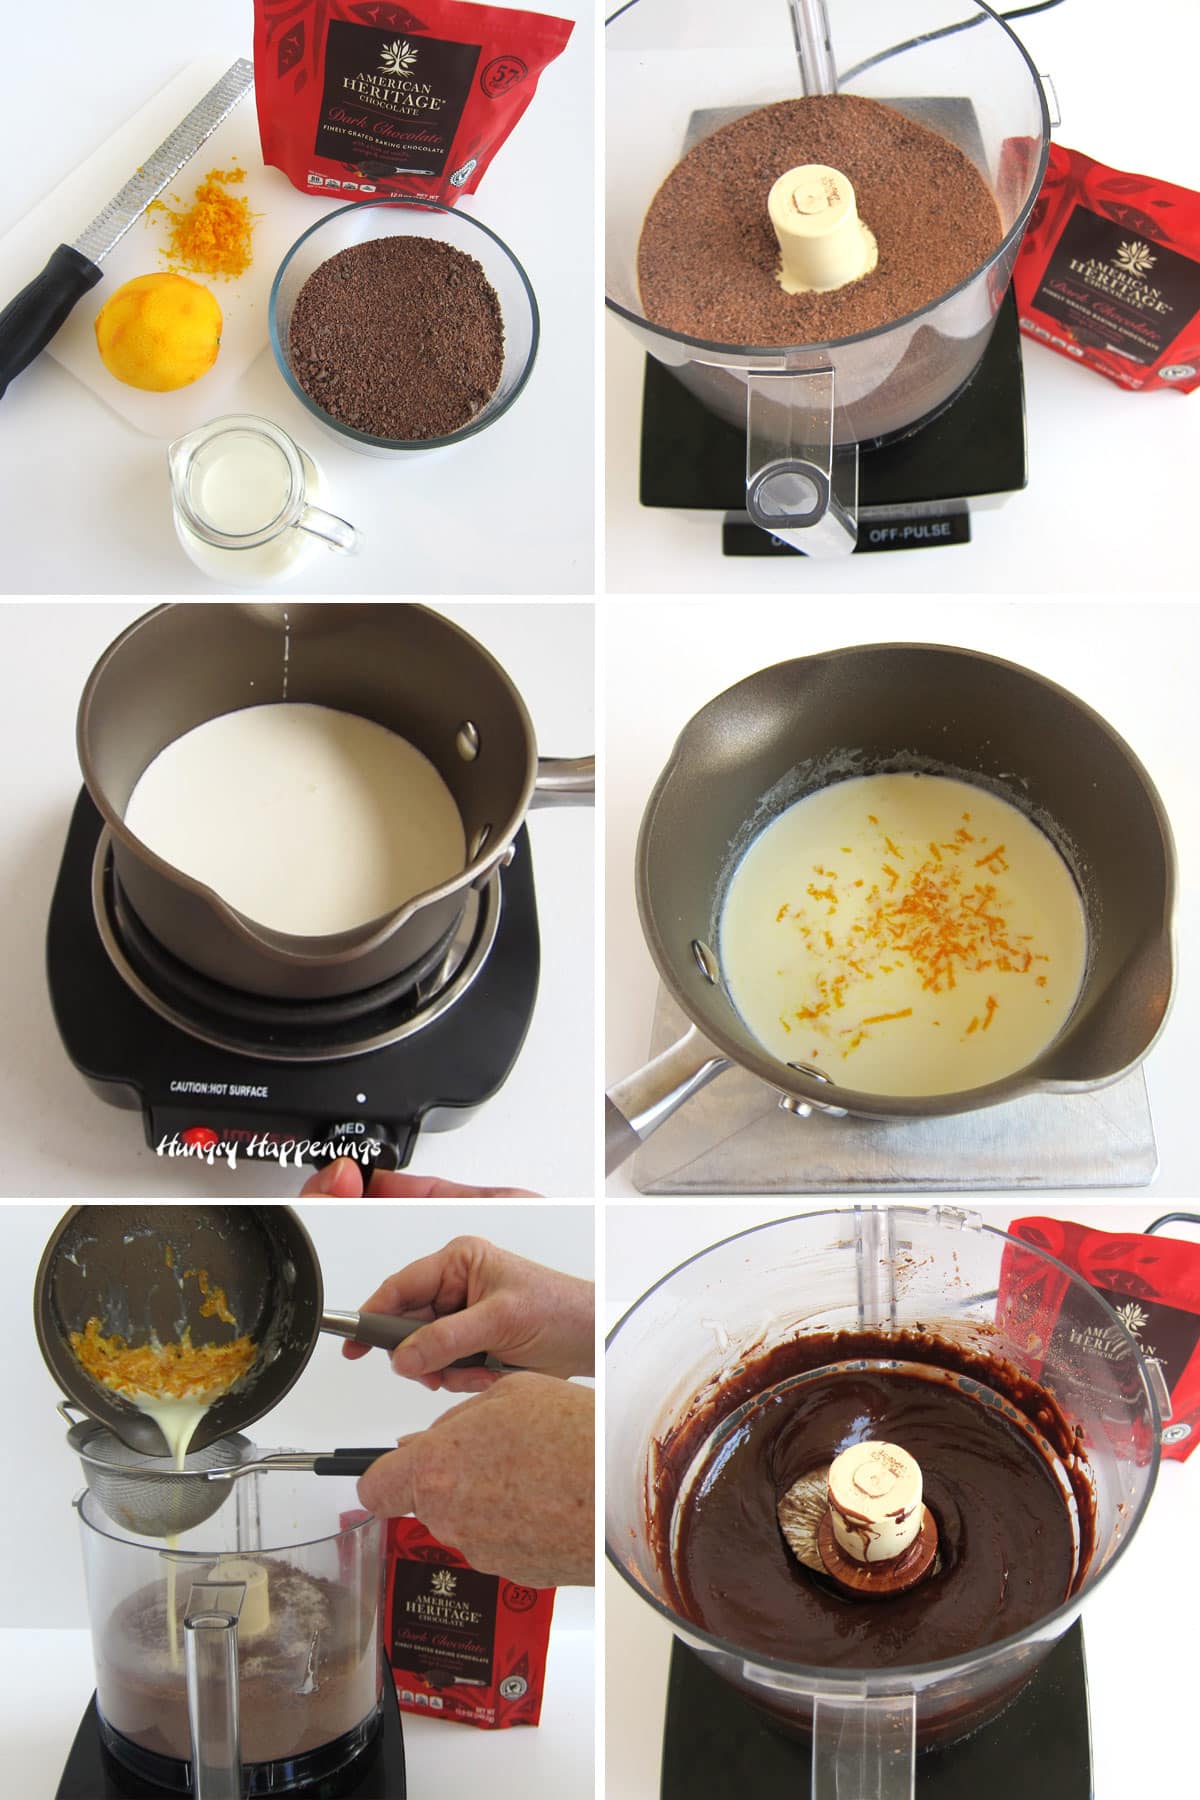
Step 1 - Grate orange peel.
- Use a grater to zest an orange.
- Be sure the orange is washed and dried.
- Then scrape off just the orange peel using the grater.
Step 2 - Heat cream, then steep with orange peel.
- Pour ¾ cup of heavy whipping cream into a saucepan.
- To make your chocolate ganache nice and shiny, add two tablespoons of corn syrup to the pan.
- Heat over medium heat, stirring often, until bubbles begin to form around the edge of the pan.
- Remove the pan from the heat and add the orange peel.
- Set the pan aside for 15 minutes to allow the orange flavor to infuse in the cream.
- If you do not use the orange zest, you can move ahead to pour the cream over the chocolate.
- Place the pan of cream back on the stove and heat it again until bubbles form.
- Do not allow the cream to boil rapidly, as too much liquid will evaporate. Just allow bubbles to form on the surface, then remove the pan from the heat.
Step 3 - Create an emulsion with the cream and chocolate.
- Pour the chocolate Chocolate into the bowl of a food processor.
- Hold a fine-mesh strainer over the bowl of chocolate and pour the hot cream through it to remove the orange peel.
- Allow the hot cream to begin melting the chocolate, then blend with the food processor for a few seconds until smooth. Remove the lid and scrape down the sides of the bowl, then blend again for a few seconds just until the ganache comes together.
I find using a food processor works best when making ganache. It blends it quickly before the cream can cool off too much, and it makes a wonderfully smooth ganache.

If you do not have a food processor, you can use a bowl and a silicone spatula or whisk instead.
- If making the ganache in a bowl, pour the hot cream over the chocolate and let it rest for a few minutes. The chocolate will begin to melt.
- Then, begin stirring in small circles in the center of the bowl. As the chocolate and cream come together, make the circle bigger until you incorporate all the chocolate and cream together.
- If all of the chocolate doesn't melt, you can heat it for 5 -10 seconds in the microwave.
Step 4 - Let the ganache cool and thicken.
- Allow the ganache to cool at room temperature until it thickens just enough to hold a peak. It will take 1-2 hours. Stir it occasionally as it cools.
- Just don't wait too long. The ganache will thicken and firm up and eventually become too firm to pipe through a star tip.
- I recommend making the ganache just before you begin baking your cookies.
- The cookie dough needs to chill for one hour before baking the cookies, and the cookies need to bake, six at a time, for 8 minutes. Then they need to cool slightly before being shaped into cups, cones, and tubes. So, plan on 12-15 minutes per tray.
- If you make the ganache just before you begin baking, by the time you bake and form 6 trays of cookies (36 cookies) and allow them to cool, your ganache will have thickened and will be ready to pipe.
The tuile cookie batter is quick and easy to make but it does need to chill for about an hour. It can even be made up to three days in advance.
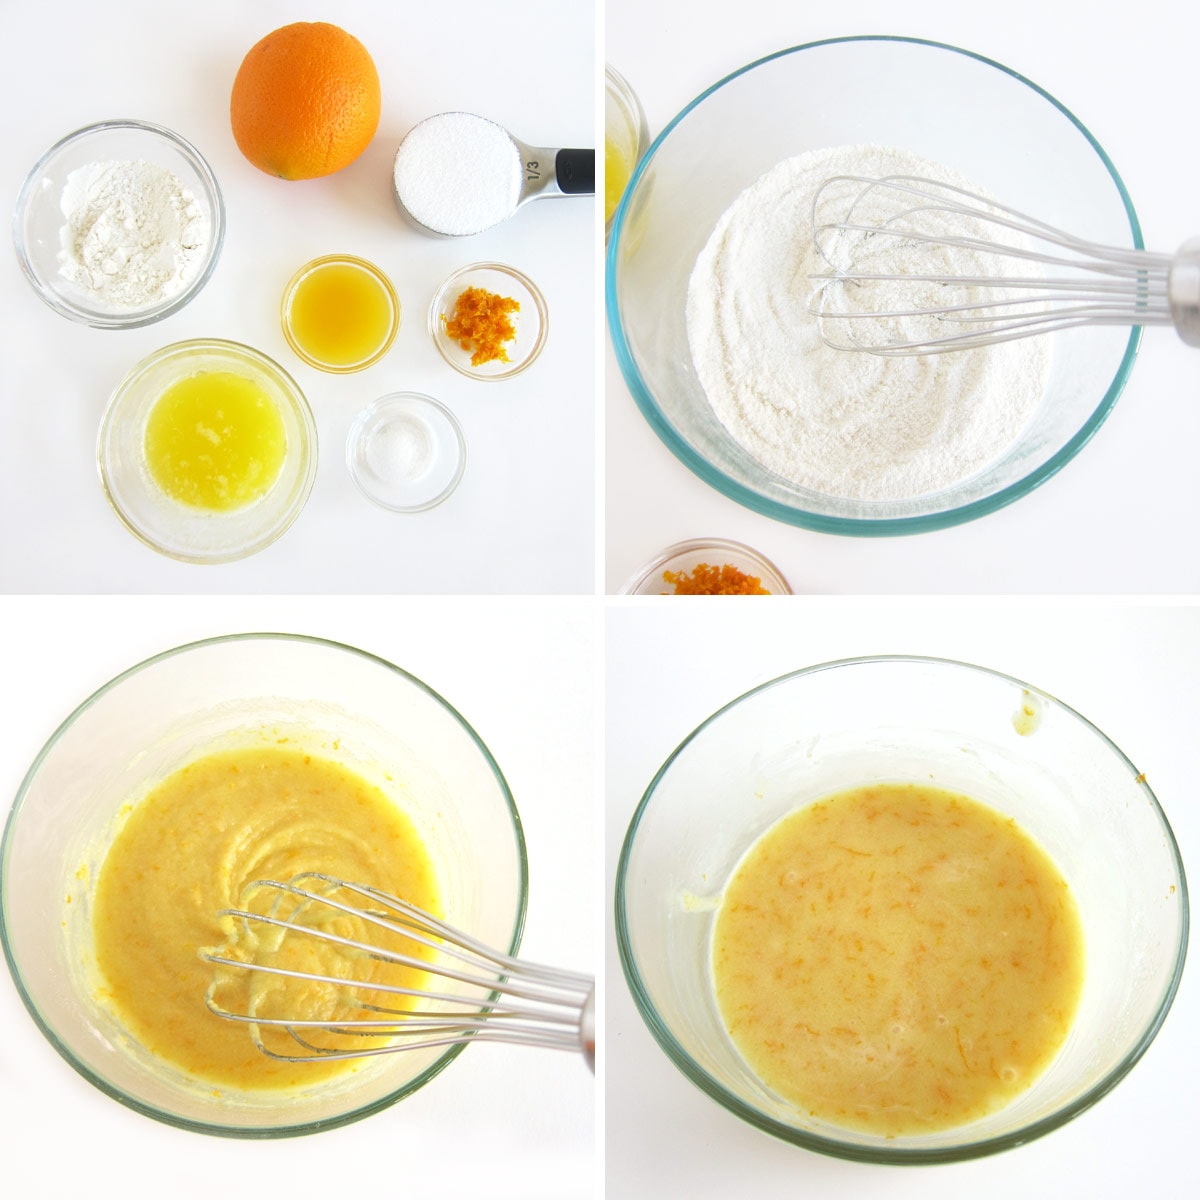
Making the cookie dough.
- Whisk together ⅓ cup of sugar, 3 ½ tablespoons of flour, ⅛ teaspoon salt.
- Then, whisk in the zest from one orange.
- Stir in 4 teaspoons of freshly squeezed orange juice and 3 tablespoons of melted butter.
- If you prefer, you can skip adding the orange zest and use 4 teaspoons of water in place of the orange juice.
- Cover and chill for one hour.
How easy is that?
Baking Tuile Cookies
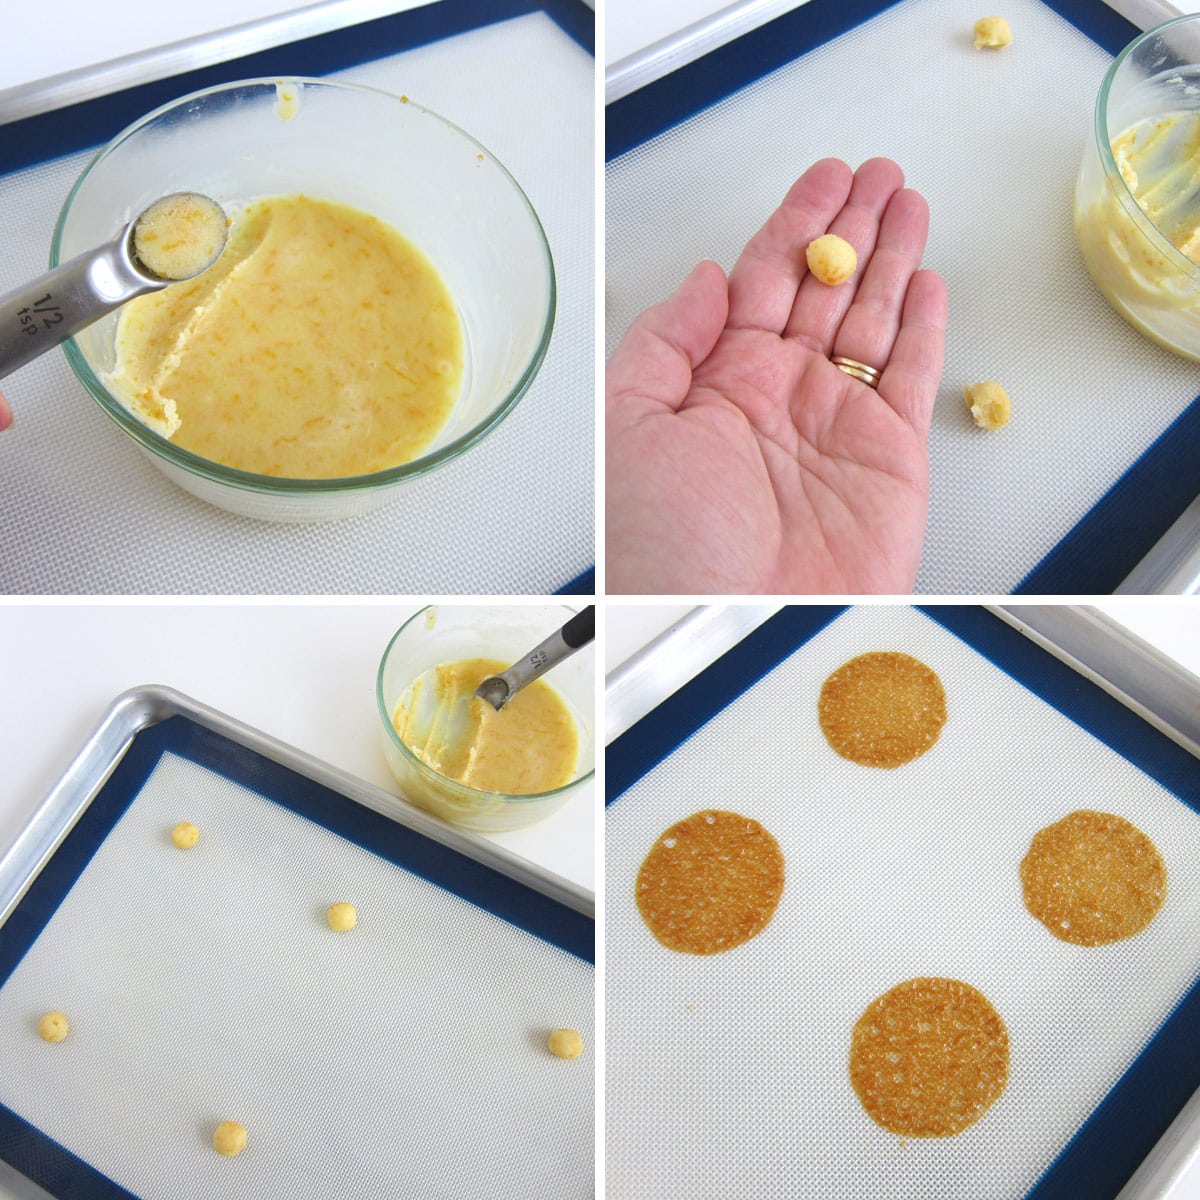
- Scoop out ½ teaspoon-size balls of the tuile cookie batter onto a silicone baking mat or parchment paper-lined baking sheet.
- Roll the dough into balls if you want perfectly round cookies. Otherwise, the cookies might spread into ovals or oblongs.
- Space your cookies about 3-inches apart, so they have room to spread.
- Bake in a 350-degree Fahrenheit oven for about 8 minutes until golden brown.
The cookie dough will spread into flat circles and create lacey cookies. Be sure to leave 3-inches of space around each cookie. If the cookies are too close, they will bake together, and you will have to cut them apart.
Bake 6 cookies at a time.
You will have room to place 8-9 cookies on a baking sheet, but I recommend only baking six cookies at a time. You will need to shape the warm cookies, and it's hard to get more than six cookies shaped before the cookies harden.
Shaping Tuile Cookies
- Before you can shape a tuile cookie, you must allow it to cool on the hot baking pan for 60-75 seconds for the cookies to firm up enough to pick them up. If you try to scrape them up as soon as they come out of the oven, the tuile cookies will fall apart.
- Use a thin metal spatula to pick the cookies up off the pan.
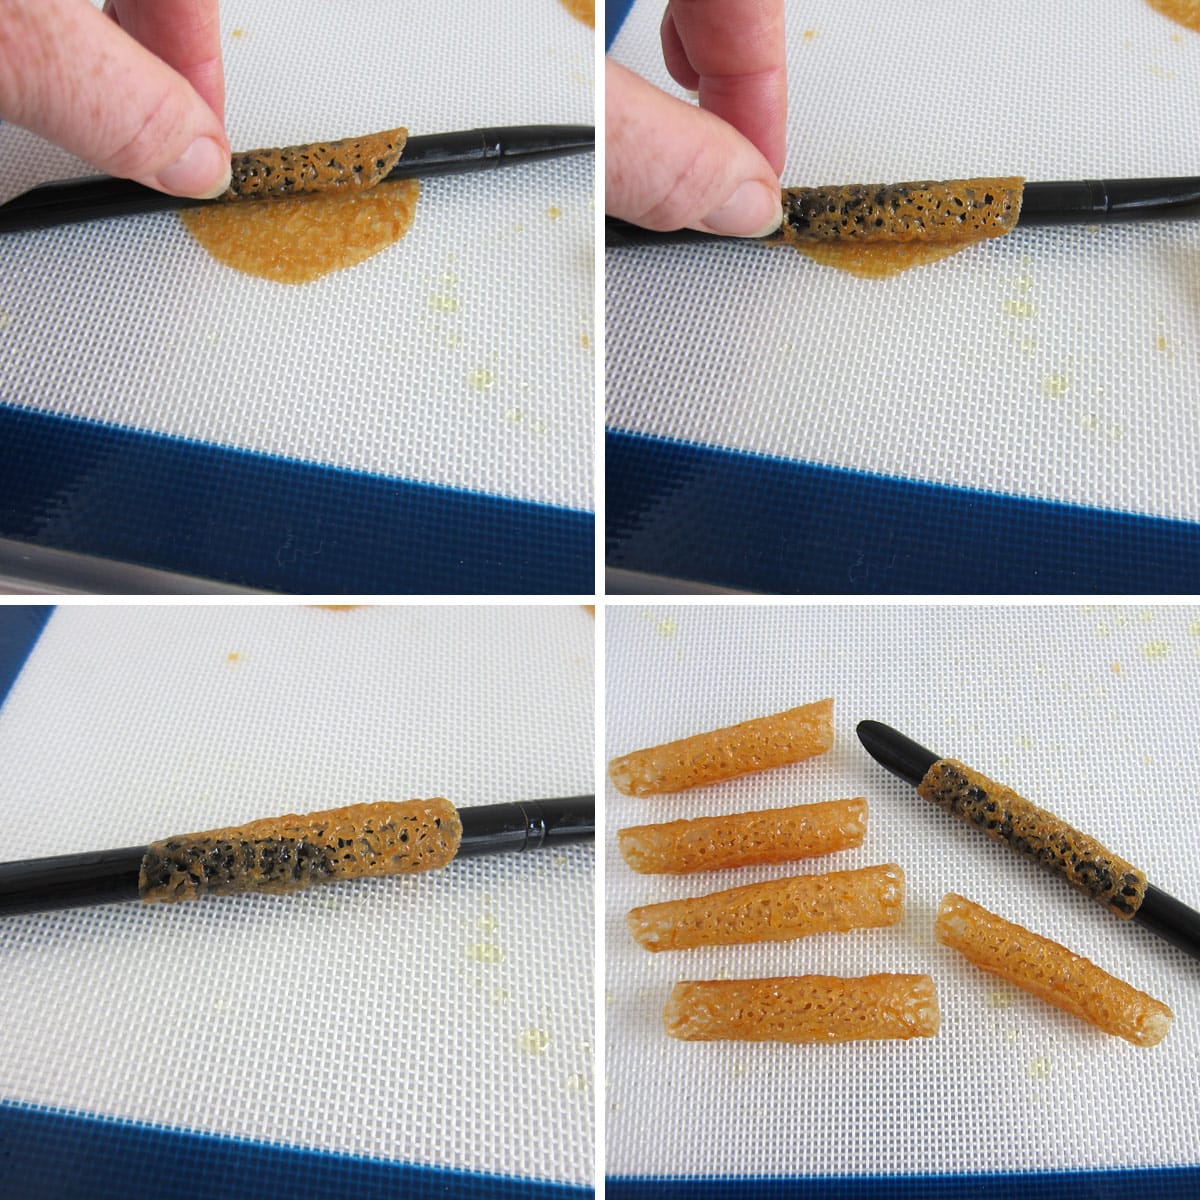
- To make tubes, you will roll the cookies around a ½-inch thick wood dowel. I actually used a paintbrush handle.
- I found it easier to keep the warm cookies on the hot pan while shaping them. It's hot on your fingers, but the warmth keeps the cookies pliable enough to roll onto the dowel.
- Let the cookie cool for a few seconds on the dowel, then carefully slide it off.
- Set it down with the seam-side down and continue rolling the remaining cookies.
If your cookies get too hard, they will crack. You need to work reasonably quickly to get all of the cookies shaped. That's why I only suggest baking six cookies at a time.
If the cookies get too brittle to shape, place the pan back in the oven for about a minute to soften them. Be aware that the tops of the cookies will harden before the bottoms. You can flip them over to warm the tops.
Tuile Cookie Cups
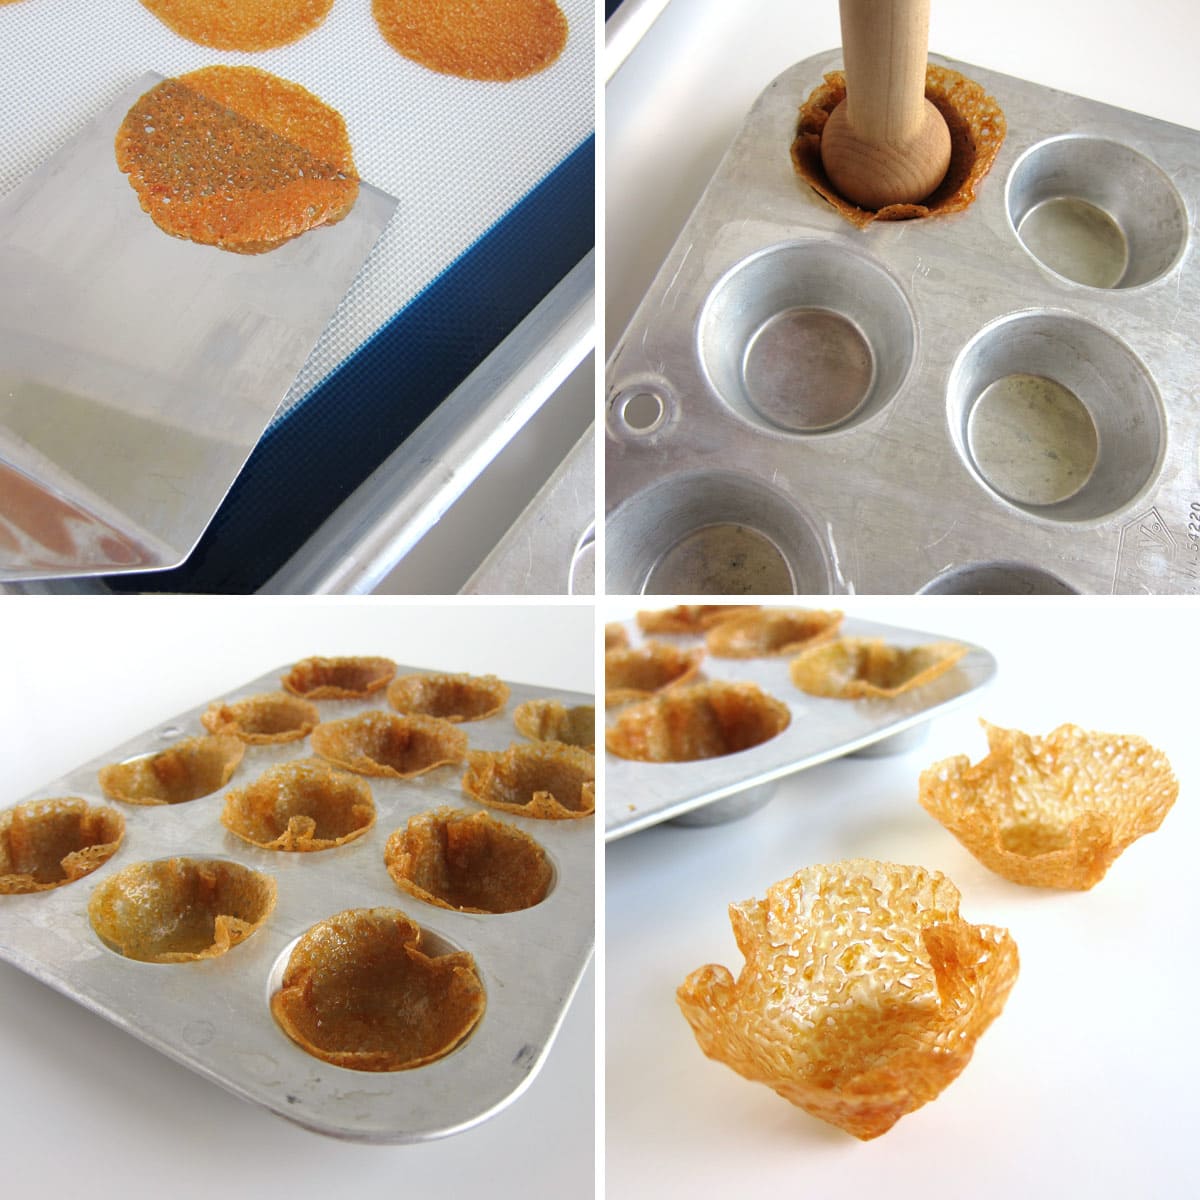
- To make little tuile cups, remove the cookies from the oven, and while you are waiting 60-75 seconds for them to firm up, place a metal mini muffin tin into the hot oven.
- Remove the muffin tin, then scrape one cookie round off the baking pan and center it over a muffin cup.
- Use a wooden tart tamper or the end of a wooden spoon to push the thin lace cookie into the cavity, forming a cup.
- Let the cookies cool in the muffin tin for 5 minutes, then carefully remove them.
Tuile Cookie Cones and Tacos
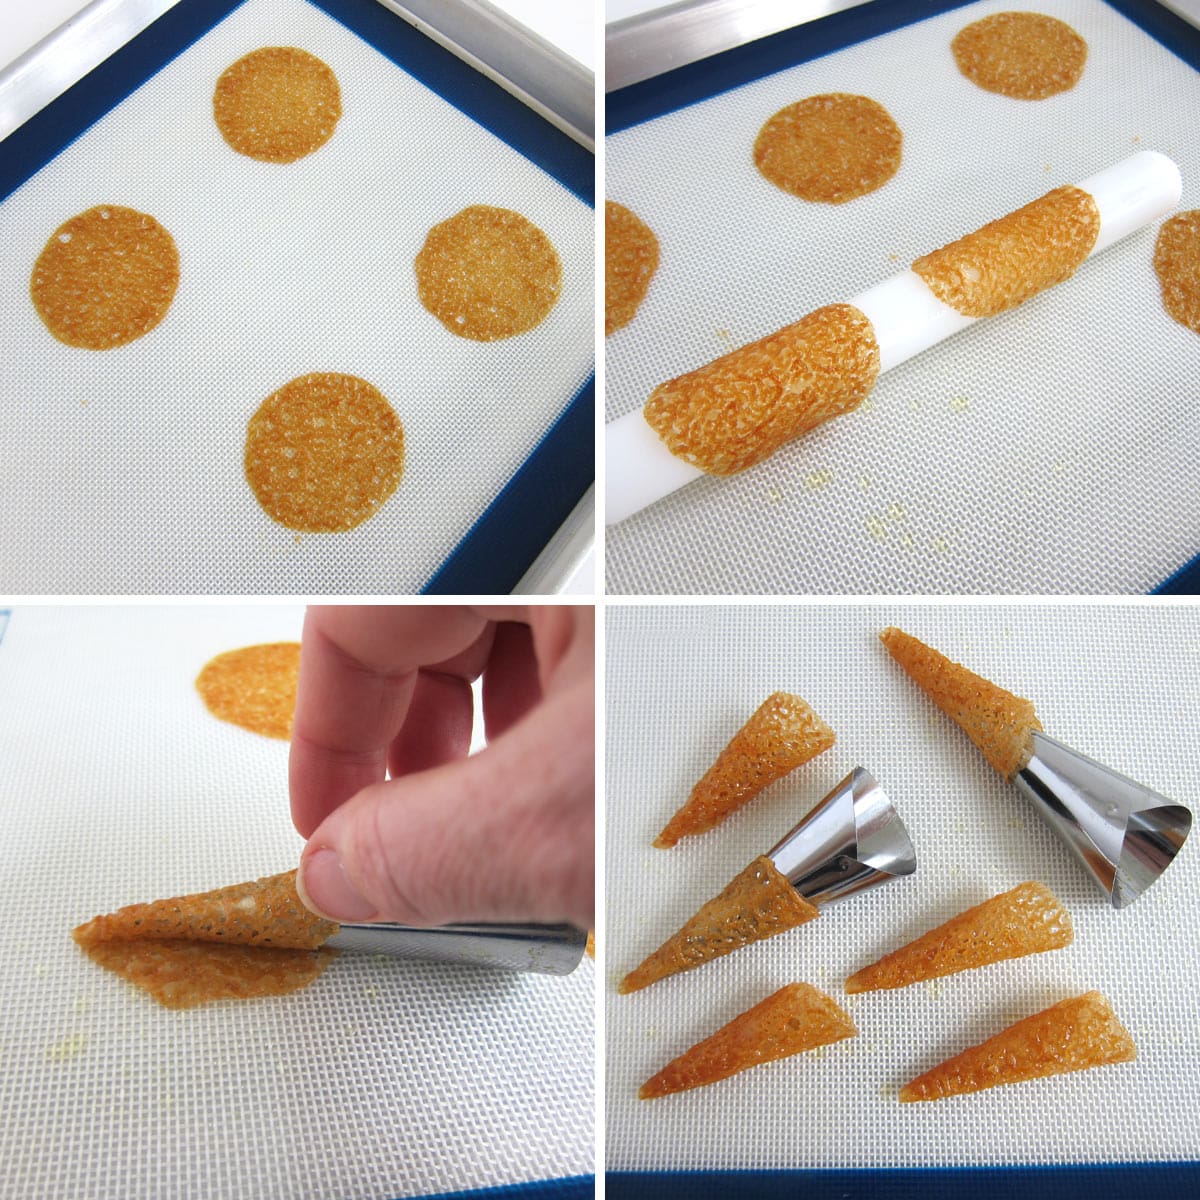
- To create simple taco-shaped tuile cookies, simply drape the warm cookies over a small curved surface like a fondant roller. Let them cool for a minute, then remove them and let them cool completely.
- To make cones, wrap the warm cookie around the tip of a metal cream horn form.
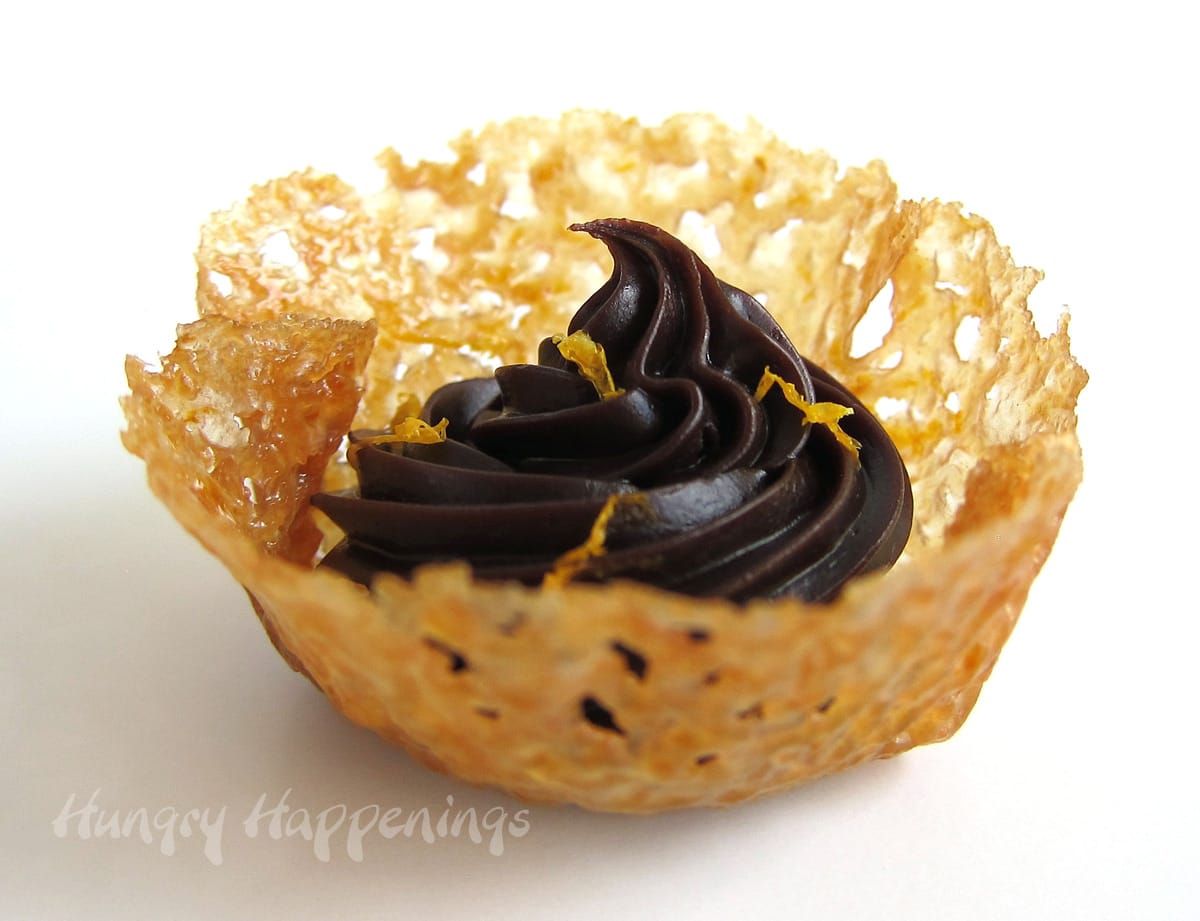
The cones are my favorite shaped tuile cookie. They look so pretty filled with a swirl of chocolate ganache.
Fill your orange tuile cookies with chocolate ganache.
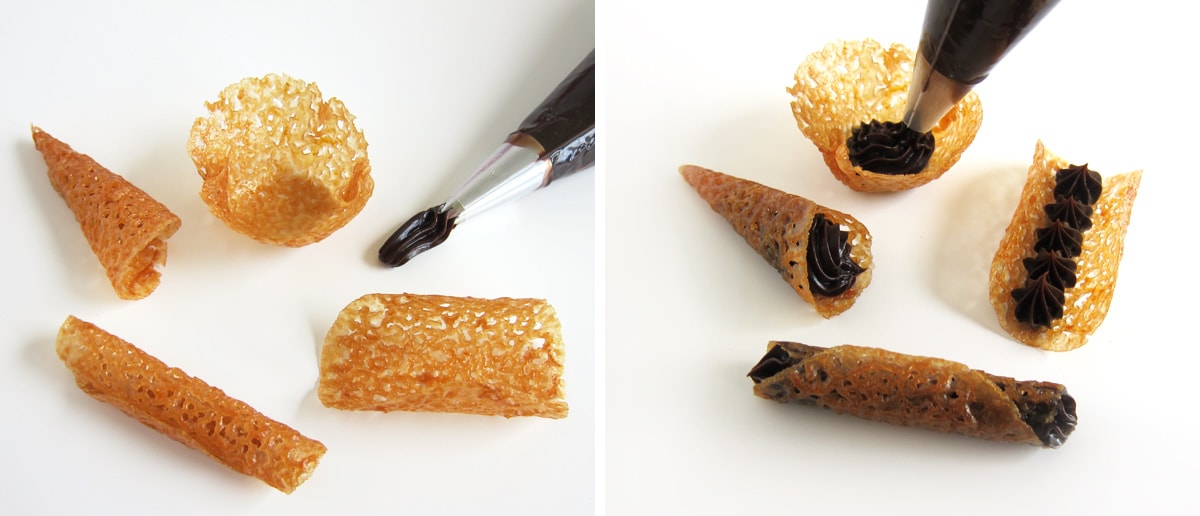
- Once your chocolate ganache has thickened enough that it will hold its shape, spoon it into a pastry bag fitted with an open-star pastry tip.
- Pipe a swirl of ganache into the tuile cookie cups and cones.
- Pipe a thin bead of ganache into the tubes. You will need to pipe chocolate into both ends of the tube to fill it completely.
- Or pipe a few stars of ganache into the base of the taco-shaped cookies.
Storing your cookies.
The cookies will keep for up to 3 days if stored at room temperature, but they will soften over time. Adding the ganache to the cookies will soften them more quickly, so I recommend piping ganache into the tuile cookies the day you plan to serve them.
Once they are filled with ganache, do not seal them in an airtight container. The cookies will get soft too quickly. Just place them on a cookie platter or in a cardboard box to transport the cookies.
Make ahead.
You can make the ganache up to a week in advance.
- If you plan to make the ganache days in advance, increase the amount of heavy whipping cream in the recipe to 1 cup and store it at room temperature for up to a week. This will make a softer ganache that will be easier to pipe once it sits for that long.
- If the ganache is too firm to pipe through a star tip, then you can warm it in the microwave for 5-second bursts of power, stirring after each until soft enough to use. If you melt it too much, you'll need to allow it to cool enough to firm up.
The cookie batter can be made up to 3 days in advance and kept in the refrigerator.
- You can also bake the cookies up to three days in advance and store them at room temperature, but they will be the crispiest the day they are baked.
- That means you can begin the process of making the tuile cookies up to 6 days before you need them.
- Just do not fill them until the day you want to serve them.
- Leave them on a baking sheet and cover them loosely with plastic wrap.
RECIPE

Delicate orange lace tuile cookies shaped into tubes, cones, cups, and more are filled with decadently rich and incredibly creamy orange-infused chocolate ganache.
- ⅓ cup granulated sugar
- 3 ½ tablespoons (1 ounce) all-purpose flour
- zest of one orange
- ⅛ teaspoon table salt
- 4 teaspoons freshly squeezed orange juice, pulp removed
- 3 tablespoons unsalted butter, melted
- 12 ounces semi-sweet chocolate, finely chopped bars or chocolate chips
- ¾ cup heavy whipping cream
- 2 tablespoons light corn syrup (optional)
-
Whisk together the sugar, flour, orange zest, and salt.
-
Stir in the orange juice and melted butter until smooth.
-
Cover and refrigerate for one hour or up to 3 days.
-
When the tuile cookie dough has chilled for one hour, preheat your oven to 350 degrees Fahrenheit and make the chocolate ganache.
-
Pour the chocolate into the bowl of a food processor. Pulse a few times to chop up the chocolate.
-
Heat the heavy whipping cream over medium heat just until bubbles begin to form.
-
Remove the heat and stir in the orange zest.
-
Let the orange zest and cream steep for 15 minutes.
-
Reheat the cream just until bubbles begin to form on the surface.
-
Pour the cream through a fine-mesh sieve over the chocolate. Discard the orange zest.
-
Close the lid of the food processor and let rest for 30 seconds.
-
Pulse for a few seconds, then scrape down the sides and the bottom of the bowl.
-
Pulse for a few more seconds until the chocolate and cream come together into a creamy smooth ganache.
-
Let the ganache cool for 60-90 minutes just until thickens enough to hold a peak.
-
Scoop ½-teaspoon-size mounds of cookie dough 3-inches apart on a silicone baking mat-lined baking sheet.
-
If desired, you can roll them into balls. This will ensure nice round cookies.
-
Bake for 6 minutes, then rotate the pan and continue to bake until golden brown, about 2 more minutes.
-
Remove the pan from the oven and let the cookies cool for 60-75 seconds.
-
Then, scrape a warm cookie off the pan using a thin metal spatula.
-
Shape it into tubes around wooden dowels, into cups using a mini muffin tin, into cones using metal cream horn forms, or into tacos using small rolling pins.
-
Let the cookies cool completely.
-
Fill a pastry bag fitted with an open star tip with chocolate ganache.
-
Pipe ganache into the cookies.
-
Serve within 12 hours of filling.
- The tuile cookie batter can be made up to 3 days in advance.
- The cookies can be made and stored at room temperature for up to 3 days.
- Fill the tuile cookies with ganache the day you plan to serve them. Do not store filled cookies in an airtight container. They will get soft and sticky.
- Place your ganache-filled cookies on a serving platter and cover them loosely with plastic wrap until ready to serve.
- The calorie count is based on 1/36 of the ingredients. The calories in each cookie will depend on the amount of ganache used to fill them.
- You may have extra ganache depending on the cookie shapes you choose.
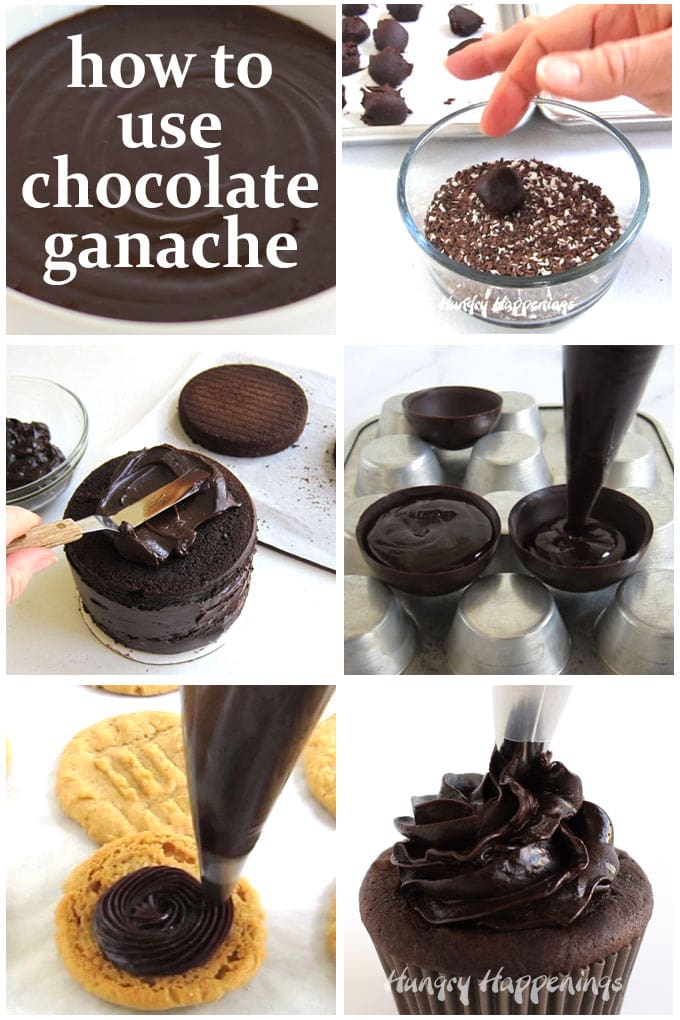
More Ganache Recipe Ideas
- Frost a cake with chocolate ganache.
- Spread or pipe in between two cookies.
- Pipe ganache frosting in a big swirl over a delicious chocolate cupcake.

- Banana Split Bars – A Fun and Easy Summer Dessert - March 4, 2026
- Pineapple Fudge (No Candy Thermometer Needed!) - March 4, 2026
- No-Bake Peanut Butter Pie Recipe - March 3, 2026
katie callahan says
Love these. They are super easy. I love the chocolate and orange pairing. I was afraid they would be too fragile and hard to work with but not so. Spritzing them with gold pixie dust for the holidays.
Beth Klosterboer says
I'm so happy to hear you loved this recipe. I love the idea of adding gold pixie dust. That should really make them look pretty.
ann says
I LOVE THIS! I cannot wait to make this during the holidays! Thank you for such a clear recipe with great step by step photographs! ❤️
Beth says
I hope you love these tuile cookies! I'm glad you appreciate the step-by-step instructions. 🙂
Erin Roush says
This looks delicious! I can't wait to try out this recipe. I've never used American Heritage chocolate before either so I'm excited to give it a try!
Beth says
Thanks Erin! The AMERICAN HERITAGE Chocolate has a really unique flavor. I hope you enjoy using it to make these tuile cookies.
Meaghan says
These look amazing! Thank you for the super-detailed instructions, I'm going to try them!
Beth says
Enjoy! If you have any questions while you are making the recipe, don't hesitate to reach out.