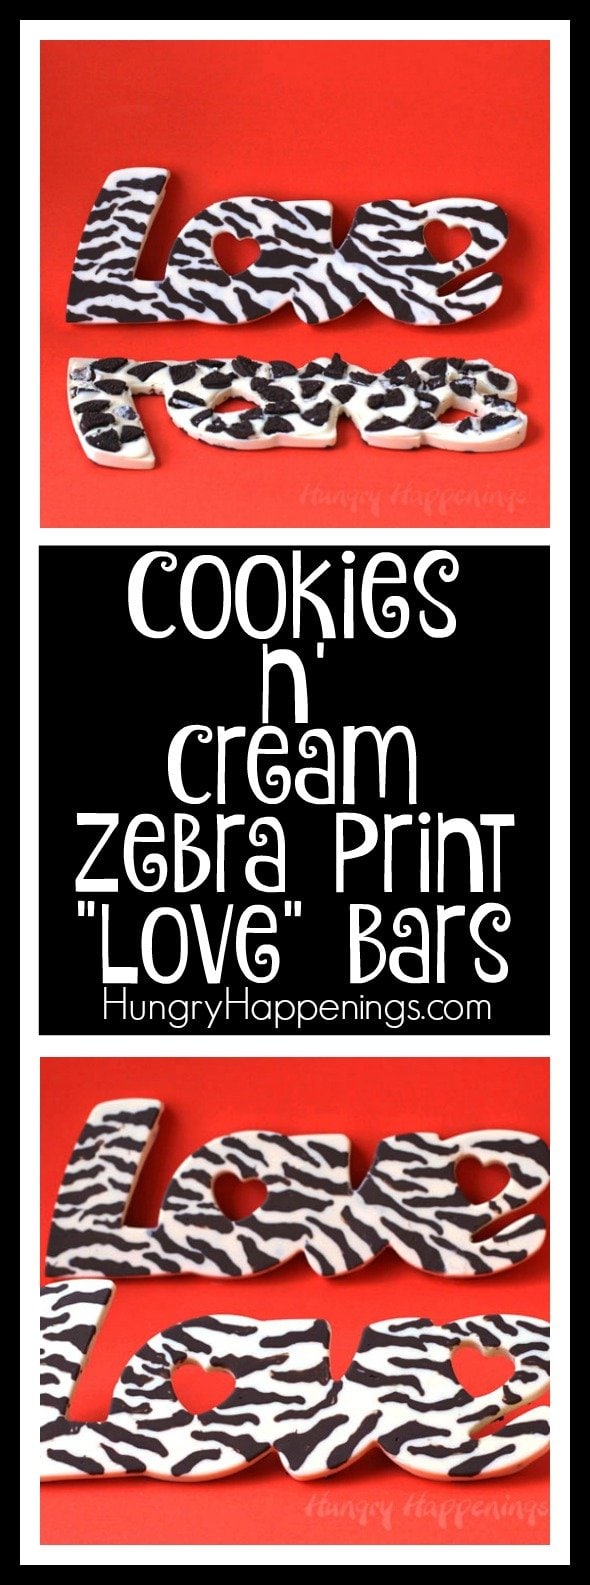
Get a little wild this Valentine's Day. Give that special someone a handmade Cookies 'n Cream Zebra Print "Love" Bar. Get them to embrace their inner animal show you what they're made of.

It's hard to believe I've been making animal themed chocolates for almost 40 years, but had never tried my hand at making a zebra print candy bar.
It is so easy.
The cool thing is that there is no right or wrong to a zebra print, really. Every zebra has a uniquely striped pattern and so did my homemade candy bars.

These bars were made in a silicone "love" mold that I recently purchased from Amazon. For some reason as soon as I saw the mold I envisioned these wildly striped candy bars.
As, I've mentioned before, my mind works in mysterious ways.
Each bar is big. I'm talking 14 inches long by just over 5 inches tall and it weighs 1 ¾ pounds.
That is a whole lotta love.
Cookies 'n Cream Zebra Print "Love" Bars
Ingredients: (makes 1)
2 ounces melted and tempered semi-sweet chocolate*
or melted dark cocoa confectionery coating
18 ounces melted and tempered pure white chocolate*
or melted white confectionery coating
8 Oreo Cookies
*For detailed instructions on working with chocolate and confectionery coating, see my Chocolate Making Tips page.
Supplies:
1 "Love" silicone mold
1 Squeeze-it Mold Painter (squeeze bottle) or food use only paint brush
Instructions:

Pour the dark chocolate into a Squeez-It Mold Painter. If you don't have one of these small squeeze bottles, you can also use a food use only paint brush.

Pipe zebra stripes onto the bottom of the silicone mold. You can also paint them on using your paint brush.
Set the mold on a solid surface, like a cutting board, and set in the refrigerator for 5 minutes.
Let the mold come to room temperature. This will take about 10 minutes.

Break up the Oreo Cookies into small pieces. Pour the white chocolate into the mold. Immediately sprinkle the cookie pieces over the chocolate.
Refrigerate, if using pure white chocolate, or freeze if using confectionery coating until hardened. This will take 20-30 minutes.
Remove and the set the mold with the candy facing up. Pull the silicone away from the candy bar all around the edges of the mold. Turn the mold upside down and very carefully begin pulling around the edge of the mold, releasing the chocolate bar.
It will easily come out of most of the mold. The "e" is the tricky part. Go slowly and gently and the bar will come out. I rushed my first bar and the bottom of the "e" broke. I just "glued" it together with some melted white chocolate. It was barely noticeable. I was more cautious with the second bar, and it came out perfectly.

These bars would look cool made with other animal prints too. Maybe next time I'll make a leopard print.
To package the bars, wrap them in clear cellophane and tie ribbons on either end.
You can find supplies needed to create this recipe on Amazon. I earn a small commission when you use the sales links in this post to make a purchase at no extra cost to you.
 DCI Silicone Word Cake Pan ...Shop on Amazon
 Wilton White Candy Melts, 1...Shop on Amazon
") Callebaut Dark Callets 70.4...Shop on Amazon
Callebaut Dark Callets 70.4...Shop on Amazon White 28.1% cacao 2 lbs") Callebaut Chocolate Callets...Shop on Amazon
Callebaut Chocolate Callets...Shop on Amazon
More Animal Themed Treats
for Valentine's Day


Buckeye Bears - Peanut Butter Fudge Filled Chocolate Teddy Bears

If you are looking for other treats or gifts to make for Valentine's Day,
you might like these other recipes too.


- How to make peanut butter? - February 15, 2024
- OREO Penguins - December 20, 2023
- OREO Snowmen - December 20, 2023


The adventures of Jolly and Happy
Wow you have some talent!!
beth
Thanks so much, that's so nice of you to say:)
Sugartown Sweets
I love how your mind works. You make everything you make look easy to make..whew! And while these really are a "whole lotta love", that's what we all need! Pinning. :o)
beth
That's sweet of you to say. I appreciate the pin!
The Partiologist
I'm another one that has to have that pan! I agree, it can have so many uses, but the way your chocolate bars turned out are amazing! They would have been perfect when I had my zebra themed Christmas Party a few years ago!
Hani Bacova
That is so cool. I've never seen that mold before.
beth
Thanks, Hani. I stumbled upon the mold while searching for Valentine's Day silicone molds on Amazon and had to have one. I can think of so many uses for it and am so excited about these candy bars. They were so fun to make and took me about 30 minutes to make from start to finish.